So it happened that I wanted to take a very close-up photo with wide angle perspective. How could be done? Somebody did it already?
Actually the story has been different, the micro-fisheye setup stumbled upon me while working at another project and just afterwards I did some more research on setups and literature, and more trials with different lenses.
Why do that? Because wide angle allows gives a special immersive perspective and increases the depth of field, which is critical in macro. And makes possible the insect subjective shots! I am geared toward strong magnifications (from 1:2 until 10:1) and high object resolution (20, 10 microns or better); angle of view, wide of course: 60 degrees is already something, but the more the better! I do not care much about image quality, beauty or sharpness; final files of 1 Megapixel will be acceptable for me. Again, the bigger will be better of course.
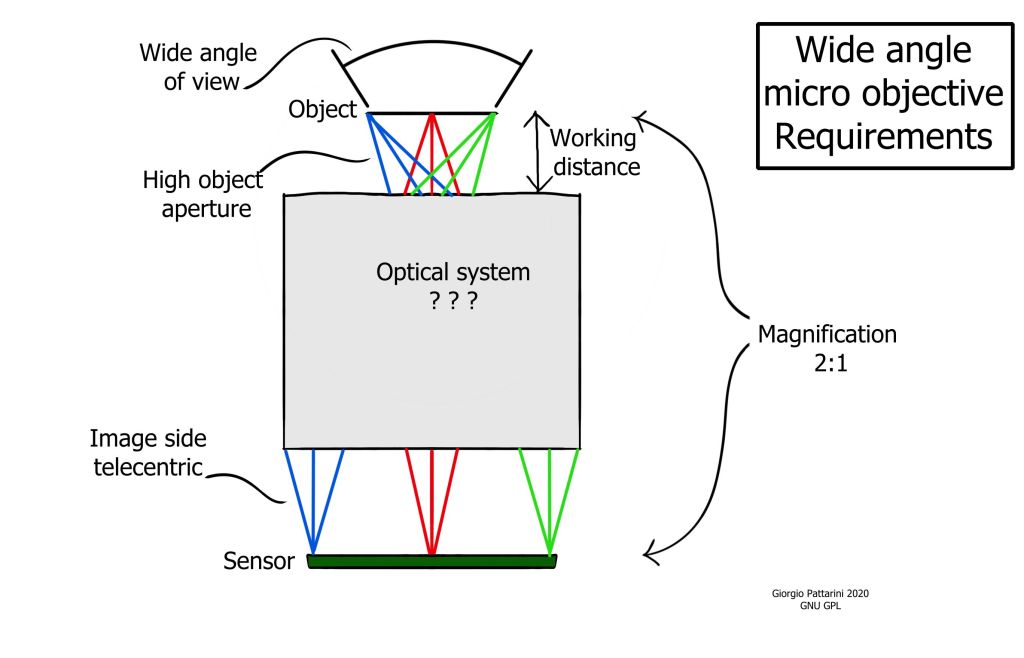
Lenses capable of strong magnification, like macro and microscope objectives, typically have a very narrow angle of view. For macro lenses, having a long focal length provide the much needed working distance and the flat perspective is usually the most desirable. For high magnification, the microscope objectives, while having a short focal length, are designed to give a flat, straight view from above. Microscopes visualize the flat surfaces or slides or microchips, so there is no need for a wide angle.


On the opposite side, typical wide angle photographic lenses have a retrofocus design, with the lens much longer than its effective focal length; it is physically impossible to focus really close, and even at near distances, the magnification ratio is unfavorable.
Further issues caused by the large front meniscuses are the movement of the entrance pupil position, translating into image distortions at close distances; the strong asymmetry of glass placement may result in displaced chromatic aberration.
There are a few macro & wide angle lens on the market already; I’ll review some in the following posts. Of course they’re not enough: I want nearer, wider, faster.
Depth of field
One thing that I wanted to understand is the depth of field provided by the wide angle. Macro typically suffer from a very shallow depth of field, with the only real solution being the laborious focus stacking. Wide angle and fisheye lenses, even at close-up distance, are capable of getting all the scene in focus. Will this trick work also with super macro? Or the depth of field comes only from low magnification and narrow aperture?
On the net are available several resources about depth of focus (DOF); I will make here the few calculations relevant to the macro wide angle. More thorough explanation is available at Edmund Optics: https://www.edmundoptics.com/resource-page/application-notes/imaging/depth-of-field-and-depth-of-focus/; an illustration of background blur, mostly for portraiture with long lenses, by Lewis Collard: https://lewiscollard.com/technical/background-blur/. A nice online calculator for the size of the Bokeh balls: https://www.howmuchblur.com/
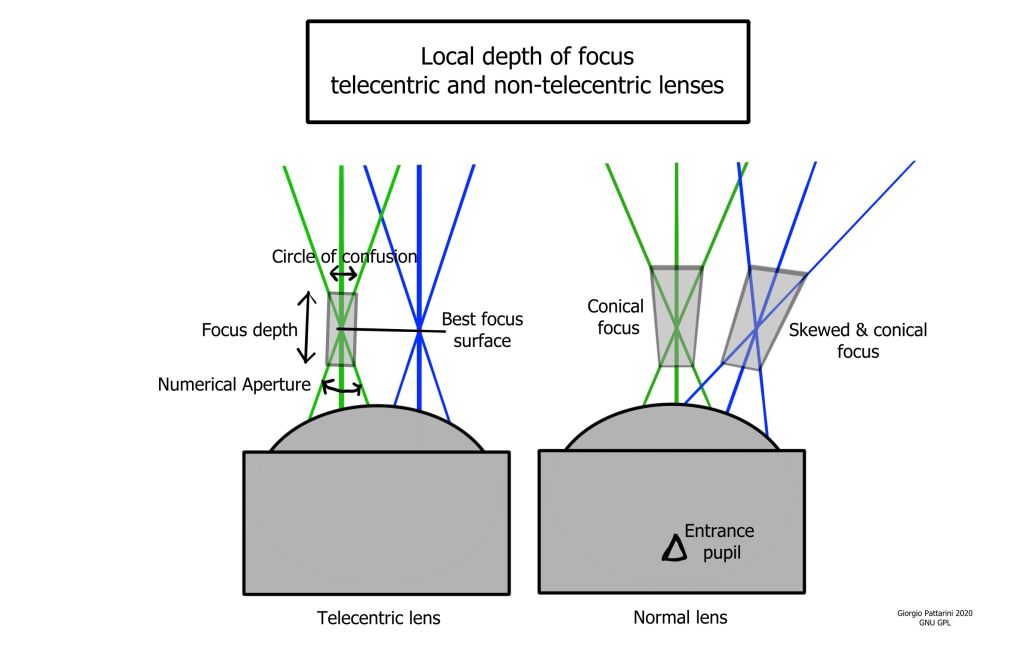
In the image below, the standard definition of DOF is simply given by the size of the circle of confusion CC (on object side) and the object side Numerical Aperture (AN):

This holds for parallel ray fan, as in a telecentric lens; in a non telecentric lens, like the wide angle, the focus region is more complicated and not symmetric. This gets complicated, but the previous formula can still be a good approximation: locally, near the axis, at close focus and with high resolution. The formula can be rewritten in term of other quantities, like the effective image f number (Feff), or the nominal (Fnom), and the magnification (m, ratio between the size of object and image); two approximations in the case where the resolution is limited by the pixel size (CC=2Px) or by the NA (CC= Lambda/2NA, Lambda the light wavelength), and NA small; I do not consider the image-side NA limiting.


This is all nice and essentially correct but doesn’t tell anything about the wide angle focus trickery. So now we have a look beyond the DOF: the partly blurred background that creates the contest of wide shots. The background is not sharp, well outside the DOF, but still recognizable, while the subject is in perfect focus and can stand out. Inspired by one of the links, let’s look at the size of the “Bokeh balls”, or how a small light at infinity will look like on an image focused at close distance. Large balls=blurred background, small balls=almost sharp background. All considerations are only for on-axis; at the wide corners gets more complicated, due to the type of distortion and the actual NA at the wide ends.

Many parameters will depend on lens design; at first let’s do the calculations for a simple single thin lens, non-telecentric. The angular bokeh ball size is directly related to the NA alone, and its apparent diameter hoBB (in the object focus plane) depends on the distance do between the lens entrance pupil and the focus plane (simple lens). The back focus distance is ds; in focus, those two are related by the lens equation to the focal length f of the lens. Thus the image size of the bokeh ball hBB can be expressed only by the focal length and the aperture:


It seems to work! With same magnification and NA, the bokeh balls gets smaller as the focal length decrease, which correspond to going wide angle. One simple geometrical explanation is that, the bokeh balls have constant angular dimension; with a narrow angle (long focal length) they appear large, while with a wide angle (short focal length), they get apparently smaller in the wider view. For strong macros I need a combination of high magnification and high NA, so the focal length is the only free parameter to shrink those balls. All those calculations do not mean that the local DOF, of the sharp details, has improved; with high NA, it will still be very thin. Only, the background is less blurred.
On the opposite direction, if I want the background strongly blurred, narrow long lenses will do the job.
Rather than the simple lens a more desirable design asks for image-space telecentric, to cover a fixed angle. This is an objective that shows no focus breathing (no change of the angle of view while focusing); it is more difficult to manufacture but is the type of lens we need, for several reasons. The inside working can be exceedingly complicate, but the final results about bokeh ball size are essentially the same as for the simple lens.
What is the limit of short focal length? It depends. An hypotetical macro fisheye, perfectly image-telecentric, with equidistant projection and full 180deg view, when at 1:1 macro (at the centre) maps an half circle of radius do to the sensor, which then need to be SW=pi*do wide. It is telecentric so ds=infinite, then from lens equation f=do = SW/pi.
Conclusion: the fisheye, as we already know, has a focal length bonded to the sensor size. About 8mm for 35mm format, 6mm for the APS (image circle inscribed in the sensor, for full 180 view). This is the smallest focal length filling the sensor, with equidistant projection.
On the other side, a non-distorcing lens (mapping plane to plane) has no lower limit for its focal length. An ideal example is the simple, single glass sphere – can be as small as we want, mapping an infinite object plane to an infinite sensor. But we live in the material world, and the the way to the infinite is long (infinitely) and full of obstacles; so those lenses are usually manufactured only down to a manageable focal length, about 1/3 of the sensor diagonal in the most extreme designs.
So we are left with the last option: let’s shrink in size both the lens and the sensor, and make a tiny tiny camera. The lens shrinks, and the sensor too; less magnification is needed to image a given subject; but must be counted also the fact that the bokeh ball image gets larger relative to the shrinking sensor. The end of the game is when we hit the hard wall of the minimum pixel size, about 1 micron; so for mediocre 1Megapixel images, we need 1x1mm sensor, and the shortest fisheye will have a focal length of 0,5mm. For a good 12 Megapixel, we have a range of 1/2.3″ or so sensors of mobile phones, with their built-by-the-billions 3 mm fl lenses. I would consider this design as the smallest usable. Note that high magnification microscope objectives (100x) of the past have converged to the same focal length, while from an opposite direction.
How much detailed is the background? It depends on the relative size of bokeh balls and sensor; the number of balls that fit in the image may be taken as measure of the background linear resolution; for the fisheye lens, sensor and lens are related as before, so:

This last equation tells two things: one, if we want high magnification (m>1) and really high object resolution (like NA>0,2) then, even the fisheye won’t show much more than a few blobs of the background. Second, the background blur will look the same for all fisheye cameras – given the same magnification and NA. Thanks, it is called scaling. Small sensors get an edge since they have smaller pixels, thus need less magnification, but that’s their only advantage. Larger sensors, on the other side, can have more pixels, for more details of the focused subject; and for high magnifications (m>1) the sensor-side NA itself may become limiting in practice. This last fact cancels any advantage of small sensors: scaling down a camera, while mantain the same field of view and image-side aperture, will reduce the object-side aperture, hence lower available resolution.
Let’s see some examples for typical macro photos, with different angle of view. The object-side lens aperture is adjusted to obtain a required object resolution, and the magnification will depend on choice of sensor. As shown above, the result is independent on the sensor (the image may be enlarged and projected on any sensor, with the needed magnification; with resolution being limited only by the object-side NA).

| Angle of view –> | ||||||
| V Resolution micron V | NA | 180 deg | 90 deg | 45 deg | 20 deg | 10 deg |
| 100 um | 0,0025 | 600 | 300 | 150 | 70 | 35 |
| 30 um | 0,008 | 200 | 100 | 50 | 20 | 10 |
| 10 um | 0,025 | 60 | 30 | 15 | 7 | 3 |
| 3 um | 0,08 | 20 | 10 | 5 | 2 | 1 |
| 1 um | 0,25 | 5 | 3 | 2 | 1 | 0,6 |
With more than 100 of linear resolution, the background is quite recognizable. Between 10 and 100, strongly smoothed. Below 10, there are only few blobs. For the fisheye lens, the maximum resolution that allows a recognizable background is about 10 micron.
Close wide angle perspective
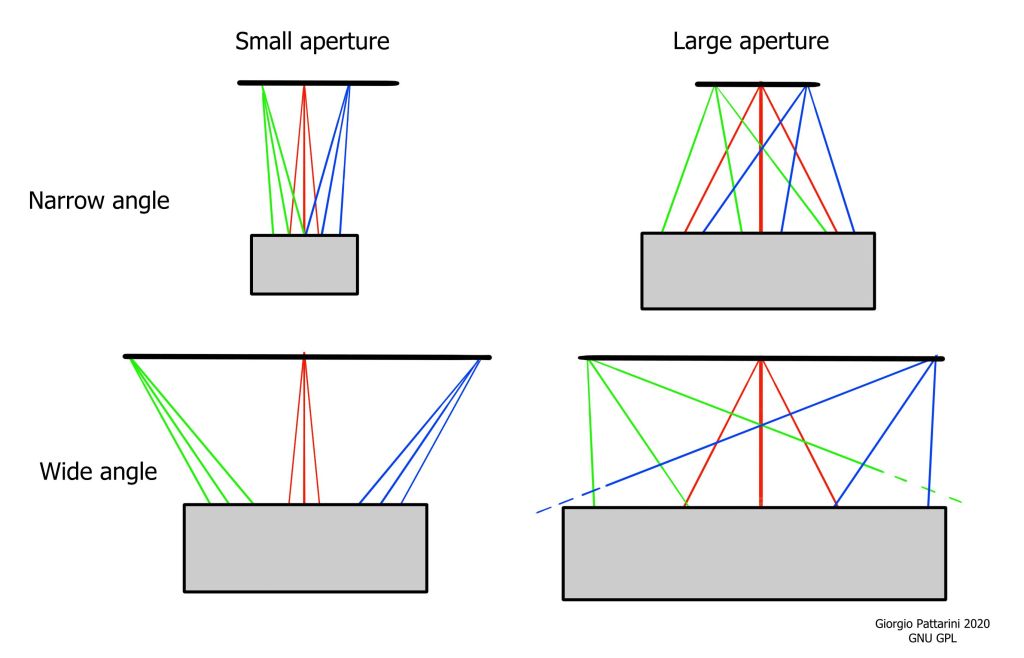
The impression of immersion in the scene provided by wide angles derives from the point of view, that is very near to the subject and provides the actual perspective of a small observer.

To have macro magnification with wide perspective asks for the point of view to be really near to the subject; the distance between subject and entrance pupil is in the order of the framed subject size. Instead normal macro lens, with long focal length, will have a working distance much longer. The entrance pupil, angle of view and perspective are less simple than they appear in those drawings; see for example an article by Rik Littlefield on the subject, or a short and clear definition of the field of view by Bob Atkins.

The high NA and the wide angle may fight against each other, since they both must fit in the acceptance cone of the lens. It would be rather difficult and expensive to manufacture a lens with more than 180 deg acceptance angle! Fisheye lenses manage to collect light from 180 or more, thanks to their convex front lens. If we want high resolution, having a high NA near 1 will make wide angle very difficult, hindering anything but telecentric. But for now I would be rather happy with a good lens with NA=0,1 (about 10° wide light cone) and 120 deg of view, total 130 deg, may be feasible. If we accept a decrease in NA away from the axis (pupil rolloff), high central NA and wide angle can be made compatible.
Distortion
A lens with zero distortion, or rectilinear, has uniform magnification across the field. That is good up until a certain field width; going wider, it becomes more and more diffcult to manufacture such lens. A 180° view rectilinear lens doesn’t exist, as it will need an infinite sensor and/or zero focal length.
Zero distortion is useful if I’m shooting flat subjects like banknotes or electronic chips; but for the maco we ae goint to take with a wide angle, it may be counterproductive. It can instead be beneficial to have higher magnification in the centre and less on the sides; this is done for example by fisheye lenses. The subject in the centre gets enlarged, while the context around compressed – so more context can fit in the shot. Also, the effective aperture (NA) typically decreases away from the axis, so compressing the image can compensate the loss of resolution.
Exactly which projection is best, that’s a choice mostly aesthetical. I’ll divide the lens in three groups:
Rectilinear – no distortion (classic wide angle, up until 120 °) F-tan(theta).
Equiangular – some central magnification (Fisheye lenses, up and over 180°) F-theta.
Orthographic – strong central magnification (Some weird topographic lens, up 180°) F-sin(theta).
In practice, we’ll meet some rectilinear some equiangular, and some more in between.
Curvature
I don’t need the lens to have a perfectly flat field. If we need to shoot flat surface like microchips, butterfly wings, microscope slides or test gratings, there are already better tools for the job, and a wide angle is pointless. I will try to keep track of the field curvature of the lenses tried; it is better to have flat field when focusing at infinite (infinite is flat, believe or not); or on the opposite side, it may be beneficial to have a curved best focus surface for some nearby subjects.
Maximum resolution
To have a wide angle perspective with high magnification, we need to go near the subject; How near can we go? If I go so near as, for example, one micron, I expect to see just a few very large light waves, coming now and then: not a detailed image. The amount of object detail that can be collected is limited by the size of such waves.
We need to understand what is the maximum “etendue” of an objective, this etendue being how much details are contained in the image, which we can measure or call as the amount of Megapixels; see for example the nice article by Zhang and our beloved Gross about the capability of microscope objectives. This is independent on the sensor and the applied magnification.
On the object side, the spatial resolution is limited by diffraction, and can be computed from the Numerical Aperture and the wavelength of light used; and the size of the object imaged (in the simple case of rectilinear lens) depends on the angle of view and the distance of the entrance pupil/center of perspective; see drawings above. Call now 2*theta the angle of view, and d the pupil-object distance; the total linear etendue can be calculated: (I use one pixels for each resolved point; that may be discussed)

As seen before, NA and angle of view compete for space in the lens light acceptance cone; a realistic limit for this cone is 180 degrees, meaning a large flat front lens; the aperture acceptance angle is 2*alpha, hence a maximal NA / angle of view objective follows:


This function gets maximal for theta =45 degs: a 90 degrees angle of view and NA 0,71. I take this lens as example; and calculate the amount of pixels that match the amount of detail contained in the image circle.


As expected, reducing the distance reduces the total resolution, and at a distance of few wavelengths, the image will have only few pixels. This is only a crude estimate, and will change a bit for different configurations; for example, if we project the image onto a rectangular sensor, usually we want to fill it; the sensor must be inscribed in the image circle, and some detail get clipped off; this will reduce the available resolution by about 0.6, depending on sensor format proportions. Also, the acceptance cone will be smaller than 180 for a reasonable rectilinear lens, or a bit more for an extreme fisheye. Below a table with the maximum resolution available for our lens when we get closer, calculated for green light (wavelength 520 nanometers), with different NA up to the maximum.
| Numerical aperture -> | 0,025 | 0,05 | 0,1 | 0,25 | 0,71 |
| Pupil distance mm | |||||
| 100 | 100 Mega | 600 Mega | 2 Giga | 10 Giga | 100 Giga |
| 10 | 1 Mega | 6 Mega | 20 Mega | 100 Mega | 1 Giga |
| 1 | 10 K | 60 K | 0.2 Mega | 1 Mega | 10 Mega |
| 0,1 | 10 | 600 | 2 K | 10 K | 0,1 Mega |
| 0,01 | 1 | 6 | 20 | 100 | 1 K |
From this table we can see that objectives with distant pupil have enormous etendue potential; while going near, the image dramatically decrease in size. This is quite obvious since the subject filling the frame gets smaller and smaller, while resolution cannot go much beyond the micron, being capped by diffraction.
With a moderate aperture of NA 0,05 (f/10 object-side) we can hope to get good photos with a distance above 10mm; that is a big distance; immersive but not really micro. One millimeter is the minimum distance at which we can still have a decent resolution, but only with large apertures.
If we combine this table with the one of bokeh balls size, we see that a real micro fisheye cannot provide, at the same time, high magnification, high resolution and a recognizable background. This limit is reached already by existing non-macro wide angle objectives; going nearer and smaller will unavoidably blur the background. The background resolution however can be improved by focus and/or aperture stacking.
Stacking and stitching
Aperture stacking can be used to go around the riddle of high magnification with recognizable background. Only two shots are sufficient: one at large aperture, for the subject details, and one heavily stopped down, providing more depth of focus with a recognizable background. This can be done in studio setups but also in the field, as most cameras can do aperture bracketing fast and automatic. I don’t know how stacking software will handle aperture stacking besides HDR. The physical aperture (iris) needs to be “at the right place” so if open or close doesn’t influence the entrance pupil position nor the distortion.
The position of the point of view / entrance pupil becomes very delicate for focus stacking and panorama stitching: all shots must be taken from the same point of view (unless we are doing 3D reconstruction…). Keeping the pupil in place is difficult both theoretically and practically, see again the reasonings and practical solutions of Littlefield. With the pupil only few mm from the subject, small shifts result in dramatic changes of perspective.
Ideal for focus stacking is to have subject and objective in fixed position, with the sensor moving for the different focus positions. The objective will be better to be telecentric in the image space, so to avoid change of the field of view and pupil movement. Alternatively the focus can be achieved by moving a relay lens, but a new problem arises: if the aperture is controlled by the relay lens, moving it will move the (virtual) aperture as well, and in a properly designed system the aperture is the entrance pupil, our centre of perspective. The point of view will then move, nearer or farther to the subject, changing the perspective at each shot. I do not know how to estimate the amount of such shifts; they can be avoided (fixed objective and accurately telecentric image); compensated (at each focus position, move a bit the objective so to reposition the entrance pupil in the right place) or neglected (depth of stacking small compared to pupil distance, small pupil movement).
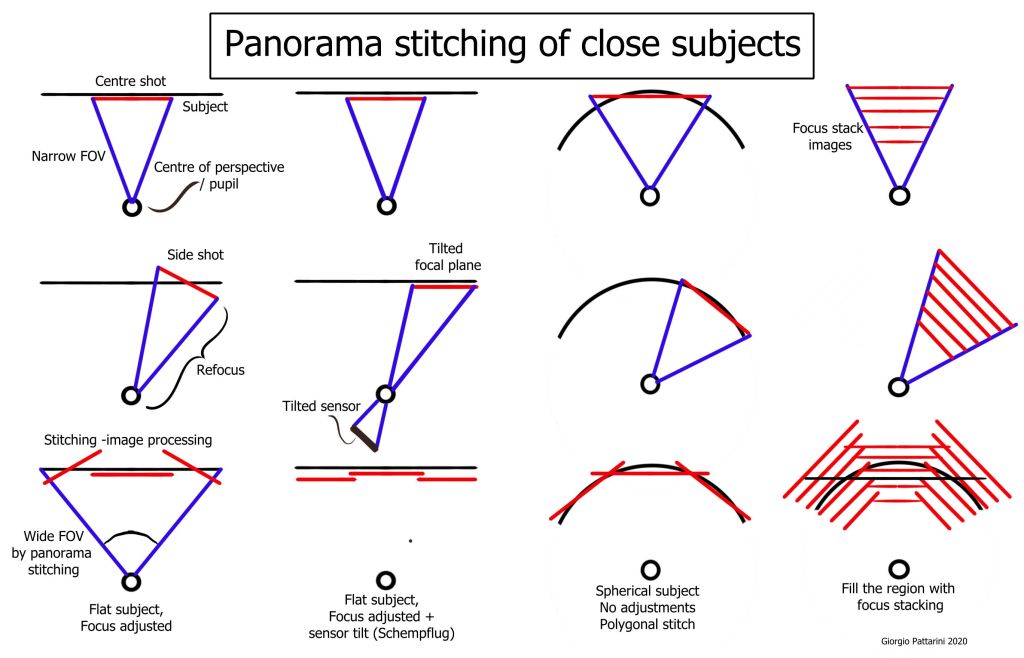
With panorama stitching we can use a narrow angle lens and construct a wide view image by stitching shots taken at different angle. The centre of perspective is the one of the lens itself, so it needs to be near to the subject, just like the wide angle objectives discussed before. I cannot do an “inside view”, micro wide angle panorama with a normal macro, since has a point of view far away; we need an objective with pupil near to the subject. The advantage of stitching in wide macro comes from the fact that a narrow angle lens is generally sharper, easier to find or manufacture and with larger aperture than an equivalent wide angle. Many narrow but sharp shots combined will provide good resolution across all image, while wide angle objectives are always more or less fuzzy at the corners.
Many shots have to be taken from different directions, so to cover a large solid angle; and again the centre of perspective needs to be the same for all the shots. This is a daunting task. The simplest case is stitching a panorama on only one direction; and the easiest way to do it is by putting the subject (or the camera system) on a rotatable platform, with the rotating axis matching the pupil. For panorama in two directions, gets messy, and I see no simple solution other than getting an old “Fedorov universal stage”. Another sophisticate way is the panning head of Nagler’s sonde, that we will look in detail later.
To make panorama stitching even harder, comes the fact that the distance of the subject changes! Objective lenses are usually “flat field”, meaning that they focus on a plane; but this plane rotates as we rotate the view direction, so the lens will actually focus at different distances, depending on the angle; and that is quite a lot for wide angles. So, to make shots that can be combined onto a single image of a plane in focus, we will need to re-focus each direction shot, (and possibly with focus stacking or tilted sensor!). Otherwise, we may stitch the photos with constant focus onto a polyhedral-spherical image (the shots are not stitched on a plane, but as facets of a polyhedra). Did somebody wrote the software for that? (Probably yes, but I don’t know). This spherical stitching will benefit from the objective not having flat field, but curved, with optimal focus radius of curvature matching the pupil – subject distance; that is like the solution I’ve used in some setups (still to write it down).
All those issues do not arise when doing panorama stitching of long distance landscapes, since everything is in focus already, and good software has been written that fixes distortion etc. for us, all with just a click.
All this job of panning around the pupil is quite laborious; and it is true that standard macro lenses (non-wide) are sharper than the wide ones. Can we then simulate the wide angle perspective, either by focus stacking or by taking photos from different angle-without caring about the pupil position, and using a normal, sharp macro? Yes, no, almost.
Of course if we manage to make, with whatever lens or technique, a full 3D reconstruction of the object, then, it’s done, we have a 3D model and with appropriate software we can render the image from whatever point of view, included my beloved micro-fisheye. But making accurate 3D reconstructions ain’t easy; focus stacking from a single point of view can reconstruct the 3D very well, but the overcasts will remain hidden. To have information about all sides of an object we need to take photos from all sides, and to get good resolution, each point of view will need its focus stacking. That is a lot of photos to take, a lot of messy data to crunch for the 3D reconstruction software, a lot of manual fixing of all the small errors of the software. Believe me, I have spent months manually patching holes in 3D laser scans. And can I imagine the developers of those software having nightmares of missing triangles.
All this hard job is barely feasible in the studio; if we want to go outside, in the nature, taking all those shots gets unpractical (the live bugs always like to change pose or fly away after shot #3) and the 3D reconstruction should encompass all nearby plants and backgrounds; too much. Maybe the next cool phone with 10 cameras will do the job in one click? Maybe; good luck to the developers!
The other obstacle is physical: I can put the fisheye inside an hole and take a photo from there; reaching what is not visible from the hole entrance. I really can’t take such photo from outside. This is the job of probe lenses, borescopes and endoscopes (which are wide macro mounted on the tip of a long stalk, so can go inside narrow holes). We could make a periscope with prisms and mirrors, that brings a narrow angle objective inside the hole and can pan it around; there exist such devices, they are called periscopes. Almost all is possible; time, money and practicality will decide which is the best solution for each application.
Candidate objectives
There are at least four ways to circumvent the close focus problem of wide angle lenses:
One, take a wide angle lens, and make it smaller. I have found that the background blur doesn’t improve; but since the lens and sensor are smaller, I need less primary magnification, and the minimum focal distance constrain of retrofocus lens is reduced, with the lens physically closer to the subject. Hence a standard retrofocus design can be used. The image formed may be picked directly, or enlarged by an extender or a relay system, then projected onto a larger sensor. Thanks to the widespread application of small sensors, there is plenty of small, wide angle objectives to try! Objectives made for small sensors have large aperture, in order to resolve small pixels. That may be good (high aperture also available for object-side resolution) or bad (more aberration when the lens is used in close focus, outside its optimal).
Two, use a lens with forward entrance pupil. There exist designs where the pupil is in front of the lens; in this case, it is easy to focus until the pupil position, achieving arbitrary high magnification. I couldn’t find any photographic lens available with this design, but there are non-photographic lenses too. This lens design is complex and may have low aperture, or less aberration correction than retrofocus; but promises good working distance and do not need to be realized in reduced size. This is the design I worked on mostly.
Three, find a lens of compact symmetrical design (like, a ball lens) which outputs a wide ray bundle, and collect this bundle making it image-telecentric. Finding small lenses like this is hard, and i have no idea how to collect image, so I didn’t explore much this method.
Four, put a wide-angle converter in front of a macro lens. Still to try.

My work has been in identify, mount and test existing consumer objectives; more ideal would be to make the optical designed from scratch, optimized for the special application, but that’s out of my budget; so let’s see, if we are more than 1000 that want it, could be done. A dedicated design will likely put together in optimal way all the solutions listed above.

One thought on “Micro fisheye I – the challenge”